OpenVPNサーバを立てて、自宅NWへアクセスするまで

今まで、外部から自宅環境にアクセスする際は、SSHポートフォワードを利用したりSOCKS Proxyを利用したりとポートごとに対応する大変な(そして遅い)方法でアクセスしていたため、まるごとVPN経由で接続したいモチベーションが高まっていました。
このたび、色々と躓きながらOpenVPNのサーバを立ててインターネット越しにMacクライアントから接続できるようにしたので、記載します。
概要
使用する環境は以下のとおりです。
■ 環境
OpenVPNサーバ: CentOS7, OpenVPN 2.4.2
接続元クライアント: Mac OS X El Capitan
また、構成はざっくり図のようになります。
(ここでは、自宅ルータのグローバルIPへの (Dynamic)DNSが設定されているとします、設定ファイルの中ではusername.com)

OpenVPNの接続方法にはtap(ブリッジ)とtun(ルーティング)の2つの接続方法があるのですが、今回はtap(ブリッジ)で自宅ネットワーク内のIP(192.168.x.64~127)をクライアントに割り当て、同一NW内でアクセス可能にする方法を取ります。
すべてVPN経由でアクセスさせる設定も可能ですが、今回は 192.168.x.0 への通信のみVPN経由とし、他の通信は通常通り行うようにしています。
OpenVPNサーバの構築
OpenVPNのインストール
### epelレポジトリのインストール
$ sudo yum install epel-release

### enabled=0 にして必要なとき以外使用しない
$ sudo vim /etc/yum.repos.d/epel.repo

### openvpnとその他利用するパッケージのインストール
$ sudo yum install openvpn easy-rsa net-tools bridge-utils --enablerepo=epel
各種鍵の作成
### ここからrootでないと作業しづらいため、rootになる
$ sudo su

### 鍵作成のためディレクトリ移動
$ cd /usr/share/easy-rsa/2.0/

### CA設定のためのデフォルト値を指定
$ vim vars
export KEY_COUNTRY="JP"
export KEY_PROVINCE="Tokyo"
export KEY_CITY="Minato"
export KEY_ORG="users home"
export KEY_OU="username"
export KEY_EMAIL="username@example.com"

### 環境変数を読み込み
$ source ./vars
NOTE: If you run ./clean-all, I will be doing a rm -rf on /usr/share/easy-rsa/2.0/keys

### 認証局の作成
$ ./clean-all
$ ./build-ca
Generating a 2048 bit RSA private key
....+++
...................................+++
writing new private key to 'ca.key'
-----
You are about to be asked to enter information that will be incorporated
into your certificate request.
What you are about to enter is what is called a Distinguished Name or a DN.
There are quite a few fields but you can leave some blank
For some fields there will be a default value,
If you enter '.', the field will be left blank.
-----
Country Name (2 letter code) [JP]:
State or Province Name (full name) [Tokyo]:
Locality Name (eg, city) [Minato]:
Organization Name (eg, company) [users home]:
Organizational Unit Name (eg, section) [username]:
Common Name (eg, your name or your server s hostname) [users home CA]:
Name [EasyRSA]: OpenVPN-CA
Email Address [username@example.com]:

### サーバー証明書を作成
$ ./build-key-server server
Generating a 2048 bit RSA private key
.............................+++
..............+++
writing new private key to 'server.key'
-----
You are about to be asked to enter information that will be incorporated
into your certificate request.
What you are about to enter is what is called a Distinguished Name or a DN.
There are quite a few fields but you can leave some blank
For some fields there will be a default value,
If you enter '.', the field will be left blank.
-----
Country Name (2 letter code) [JP]:
State or Province Name (full name) [Tokyo]:
Locality Name (eg, city) [Minato]:
Organization Name (eg, company) [users home]:
Organizational Unit Name (eg, section) [username]:
Common Name (eg, your name or your server s hostname) [server]:
Name [EasyRSA]:OpenVPN-CRT
Email Address [username@example.com]:

Please enter the following 'extra' attributes
to be sent with your certificate request
A challenge password []:
An optional company name []:
Using configuration from /usr/share/easy-rsa/2.0/openssl-1.0.0.cnf
Check that the request matches the signature
Signature ok
The Subject s Distinguished Name is as follows
countryName           :PRINTABLE:'JP'
stateOrProvinceName   :PRINTABLE:'Tokyo'
localityName          :PRINTABLE:'Minato'
organizationName      :PRINTABLE:'users home'
organizationalUnitName:PRINTABLE:'username'
commonName            :PRINTABLE:'server'
name                  :PRINTABLE:'OpenVPN-CRT'
emailAddress          :IA5STRING:'username@example.com'
Certificate is to be certified until Jun 15 08:56:52 2027 GMT (3650 days)
Sign the certificate? [y/n]:y


1 out of 1 certificate requests certified, commit? [y/n]y
Write out database with 1 new entries
Data Base Updated

### DHパラメータの生成
$ ./build-dh
Generating DH parameters, 2048 bit long safe prime, generator 2
This is going to take a long time
....................................

### TLS通信のための鍵を作成
$ openvpn --genkey --secret /etc/openvpn/keys/ta.key

### クライアント鍵を作成
$ ./build-key client01
Generating a 2048 bit RSA private key
.........+++
..............+++
writing new private key to 'client01.key'
-----
You are about to be asked to enter information that will be incorporated
into your certificate request.
What you are about to enter is what is called a Distinguished Name or a DN.
There are quite a few fields but you can leave some blank
For some fields there will be a default value,
If you enter '.', the field will be left blank.
-----
Country Name (2 letter code) [JP]:
State or Province Name (full name) [Tokyo]:
Locality Name (eg, city) [Minato]:
Organization Name (eg, company) [users home]:
Organizational Unit Name (eg, section) [username]:
Common Name (eg, your name or your server s hostname) [client01]:
Name [EasyRSA]:client01
Email Address [username@example.com]:

Please enter the following 'extra' attributes
to be sent with your certificate request
A challenge password []:
An optional company name []:
Using configuration from /usr/share/easy-rsa/2.0/openssl-1.0.0.cnf
Check that the request matches the signature
Signature ok
The Subject s Distinguished Name is as follows
countryName           :PRINTABLE:'JP'
stateOrProvinceName   :PRINTABLE:'Tokyo'
localityName          :PRINTABLE:'Minato'
organizationName      :PRINTABLE:'users home'
organizationalUnitName:PRINTABLE:'username'
commonName            :PRINTABLE:'client01'
name                  :PRINTABLE:'client01'
emailAddress          :IA5STRING:'username@example.com'
Certificate is to be certified until Jun 15 09:00:56 2027 GMT (3650 days)
Sign the certificate? [y/n]:y


1 out of 1 certificate requests certified, commit? [y/n]y
Write out database with 1 new entries
Data Base Updated

### 作成した鍵を移動
$ cp -p /usr/share/easy-rsa/2.0/keys/* /etc/openvpn/keys
設定ファイルなどのセットアップ
192.168.x.x の部分は適宜置き換えてください
### デフォルトの設定ファイルをコピーして修正する
$ cp /usr/share/doc/openvpn-*/sample/sample-config-files/server.conf /etc/openvpn/
$ vim /etc/openvpn/server.conf
@@ -32,8 +32,8 @@
 port 1194

 # TCP or UDP server?
;proto tcp
proto udp    # connectionはTCP/UDPどちらでもOK、しかし指定できるオプションが変わってくるので注意 (udpのほうがパフォーマンスがいいようです。)

 # "dev tun" will create a routed IP tunnel,
 # "dev tap" will create an ethernet tunnel.
@@ -49,8 +49,8 @@
 # On most systems, the VPN will not function
 # unless you partially or fully disable
 # the firewall for the TUN/TAP interface.
-;dev tap
-dev tun
+dev tap0  # tapを利用するためのインターフェース名を指定
+;dev tun0

 # Windows needs the TAP-Win32 adapter name
 # from the Network Connections panel if you
@@ -75,14 +75,14 @@
 # Any X509 key management system can be used.
 # OpenVPN can also use a PKCS #12 formatted key file
 # (see "pkcs12" directive in man page).
-ca ca.crt
-cert server.crt
-key server.key  # This file should be kept secret
+ca keys/ca.crt
+cert keys/server.crt
+key keys/server.key  # This file should be kept secret

 # Diffie hellman parameters.
 # Generate your own with:
 #   openssl dhparam -out dh2048.pem 2048
-dh dh2048.pem
+dh keys/dh2048.pem

 # Network topology
 # Should be subnet (addressing via IP)
@@ -98,7 +98,7 @@
 # Each client will be able to reach the server
 # on 10.8.0.1. Comment this line out if you are
 # ethernet bridging. See the man page for more info.
-server 10.8.0.0 255.255.255.0
+;server 10.8.0.0 255.255.255.0     # tun用の設定のためコメントアウト

 # Maintain a record of client <-> virtual IP address
 # associations in this file.  If OpenVPN goes down or
@@ -117,7 +117,7 @@
 # (start=10.8.0.50 end=10.8.0.100) to allocate
 # to connecting clients.  Leave this line commented
 # out unless you are ethernet bridging.
-;server-bridge 10.8.0.4 255.255.255.0 10.8.0.50 10.8.0.100
+server-bridge 192.168.x.2 255.255.255.0 192.168.x.64 192.168.x.127
# server-bridge [OpenVPNサーバのIP] [サブネット] [クライアントリースIP範囲] [クライアントリースIP範囲] というように設定

 # Configure server mode for ethernet bridging
 # using a DHCP-proxy, where clients talk
@@ -138,7 +138,7 @@
 # to know to route the OpenVPN client
 # address pool (10.8.0.0/255.255.255.0)
 # back to the OpenVPN server.
-;push "route 192.168.10.0 255.255.255.0"
+push "route 192.168.x.0 255.255.255.0"     # 192.168.x.0 への通信をVPN経由で接続するようにclientに通知
 ;push "route 192.168.20.0 255.255.255.0"

 # To assign specific IP addresses to specific
@@ -190,6 +190,7 @@
 # or bridge the TUN/TAP interface to the internet
 # in order for this to work properly).
 ;push "redirect-gateway def1 bypass-dhcp"   # この設定をコメントアウトするとすべての通信がVPN経由となる
+;push "redirect-gateway def1"

 # Certain Windows-specific network settings
 # can be pushed to clients, such as DNS
@@ -197,8 +198,8 @@
 # http://openvpn.net/faq.html#dhcpcaveats
 # The addresses below refer to the public
 # DNS servers provided by opendns.com.
-;push "dhcp-option DNS 208.67.222.222"
-;push "dhcp-option DNS 208.67.220.220"
+push "dhcp-option DNS 192.168.x.3"   # 自宅ネットワーク内のDNSを参照するようにclientに通知
+push "dhcp-option DNS 192.168.x.1"   # 今環境ではルータもリゾルバの役割を持っているのでセカンダリに設定

 # Uncomment this directive to allow different
 # clients to be able to "see" each other.
@@ -206,7 +207,7 @@
 # To force clients to only see the server, you
 # will also need to appropriately firewall the
 # server's TUN/TAP interface.
-;client-to-client
+client-to-client   # VPNに接続するクライアント同士の通信を許可

 # Uncomment this directive if multiple clients
 # might connect with the same certificate/key
@@ -241,7 +242,7 @@
 # a copy of this key.
 # The second parameter should be '0'
 # on the server and '1' on the clients.
-tls-auth ta.key 0 # This file is secret
+tls-auth keys/ta.key 0 # This file is secret

 # Select a cryptographic cipher.
 # This config item must be copied to
@@ -254,8 +255,8 @@
 # Enable compression on the VPN link and push the
 # option to the client (2.4+ only, for earlier
 # versions see below)
-;compress lz4-v2
-;push "compress lz4-v2"
+compress lz4-v2                 # 圧縮方式の設定、クライアントが古い場合はcomp-lzoを使用する必要があるかもとのこと
+push "compress lz4-v2"

 # For compression compatible with older clients use comp-lzo
 # If you enable it here, you must also
@@ -293,8 +294,8 @@
 # "log" will truncate the log file on OpenVPN startup,
 # while "log-append" will append to it.  Use one
 # or the other (but not both).
-;log         openvpn.log
-;log-append  openvpn.log
+log         /var/log/openvpn.log            # ログ出力場所の変更
+log-append  /var/log/openvpn.log

 # Set the appropriate level of log
 # file verbosity.
@@ -312,4 +313,9 @@

 # Notify the client that when the server restarts so it
 # can automatically reconnect.
explicit-exit-notify 1
+
+mssfix 1300
+link-mtu 1400

### 起動/停止スクリプトのコピー
$ cp /usr/share/doc/openvpn-*/sample/sample-scripts/bridge-start /etc/openvpn/openvpn-startup
$ cp /usr/share/doc/openvpn-*/sample/sample-scripts/bridge-stop /etc/openvpn/openvpn-shutdown
$ chmod 755 /etc/openvpn/openvpn-startup /etc/openvpn/openvpn-shutdown

### 起動スクリプトの編集
$ vim /etc/openvpn/openvpn-startup
 # Define physical ethernet interface to be bridged
 # with TAP interface(s) above.
 eth="eth0"    # ブリッジ先のインターフェース
-eth_ip="192.168.8.4"
+eth_ip="192.168.x.2"    # OpenVPNサーバのIP
 eth_netmask="255.255.255.0"
-eth_broadcast="192.168.8.255"
+eth_broadcast="192.168.x.255"

 for t in $tap; do
     openvpn --mktun --dev $t
@@ -37,3 +37,6 @@
 ifconfig $eth 0.0.0.0 promisc up

 ifconfig $br $eth_ip netmask $eth_netmask broadcast $eth_broadcast
+
+eth_gw="192.168.x.1"    # デフォルトゲートウェイが消される現象の対策
+route add default gw $eth_gw    # デフォルトゲートウェイが消される現象の対策

### 停止スクリプトの編集
$ vim /etc/openvpn/openvpn-shutdown
for t in $tap; do
    openvpn --rmtun --dev $t
done
+
+ service network restart   # 停止後にIPが消される現象の対策

### systemd起動スクリプトの配置と編集
$ cp /usr/lib/systemd/system/openvpn@.service /usr/lib/systemd/system/openvpn-bridge.service
$ vim /usr/lib/systemd/system/openvpn-bridge.service
 [Service]
-Type=notify
 PrivateTmp=true
-ExecStart=/usr/sbin/openvpn --cd /etc/openvpn/ --config %i.conf
+Type=forking
+PIDFile=/var/run/openvpn-server/openvpn.pid
+ExecStartPre=/bin/echo 1 > /proc/sys/net/ipv4/ip_forward
+ExecStartPre=/etc/openvpn/openvpn-startup
+ExecStart=/usr/sbin/openvpn --daemon --writepid /var/run/openvpn-server/openvpn.pid --cd /etc/openvpn/ --config server.conf
+ExecStopPost=/etc/openvpn/openvpn-shutdown
+ExecStopPost=/bin/echo 0 > /proc/sys/net/ipv4/ip_forward

 [Install]
 WantedBy=multi-user.target
起動確認
### 起動
$ systemctl start openvpn-bridge

### 上手く動いてそうであれば問題なし
$ systemctl status openvpn-bridge
● openvpn-bridge.service
   Loaded: loaded (/usr/lib/systemd/system/openvpn-bridge.service; disabled; vendor preset: disabled)
   Active: active (running) since 日 2017-06-18 15:58:38 JST; 4min 32s ago
  Process: 3344 ExecStopPost=/bin/echo 0 > /proc/sys/net/ipv4/ip_forward (code=exited, status=0/SUCCESS)
  Process: 3006 ExecStopPost=/etc/openvpn/openvpn-shutdown (code=exited, status=0/SUCCESS)
  Process: 3362 ExecStart=/usr/sbin/openvpn --daemon --writepid /var/run/openvpn-server/openvpn.pid --cd /etc/openvpn/ --config server.conf (code=exited, status=0/SUCCESS)
  Process: 3348 ExecStartPre=/etc/openvpn/openvpn-startup (code=exited, status=0/SUCCESS)
  Process: 3347 ExecStartPre=/bin/echo 1 > /proc/sys/net/ipv4/ip_forward (code=exited, status=0/SUCCESS)
 Main PID: 3367 (openvpn)
   CGroup: /system.slice/openvpn-bridge.service
           └─3367 /usr/sbin/openvpn --daemon --writepid /var/run/openvpn-server/openvpn.pid --cd /etc/openvpn/ --config server.conf

 6月 18 15:58:37 vpn.jimaoka.com systemd[1]: Starting openvpn-bridge.service...
 6月 18 15:58:37 vpn.jimaoka.com echo[3347]: 1 > /proc/sys/net/ipv4/ip_forward
 6月 18 15:58:37 vpn.jimaoka.com openvpn-startup[3348]: Sun Jun 18 15:58:37 2017 TUN/TAP device tap0 opened
 6月 18 15:58:37 vpn.jimaoka.com openvpn-startup[3348]: Sun Jun 18 15:58:37 2017 Persist state set to: ON
 6月 18 15:58:38 vpn.jimaoka.com systemd[1]: PID file /var/run/openvpn-server/openvpn.pid not readable (yet?) after start.
 6月 18 15:58:38 vpn.jimaoka.com systemd[1]: Started openvpn-bridge.service.

### 上手く動いてなさそうであれば、ログファイルを見るとなにか有用なメッセージが出ているかも知れません
$ less /var/log/openvpn.log
OpenVPNクライアントの設定 (Mac, tunnelblick)
MacのOpenVPNクライアントにはTunnelblickを利用します。
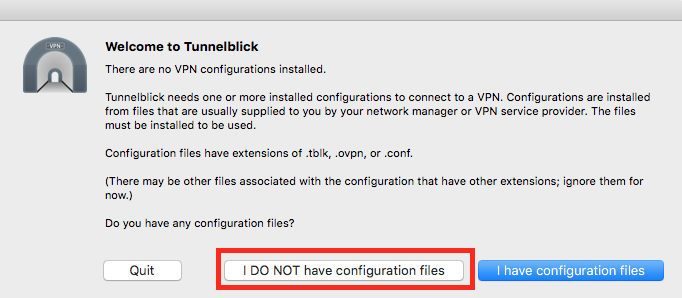
手順に沿ってインストールして起動すると、設定ファイルを持っているか聞かれるので、持ってないですと答えます。(VPNサービスに接続する際は、推奨設定が提供されるようです)

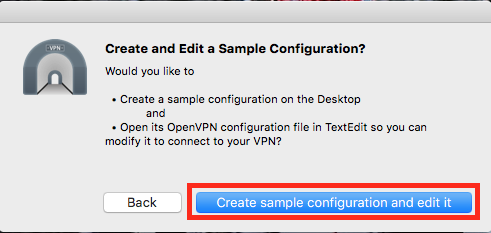
サンプルファイルを作成するか聞かれるので、これも作成するようにします。(OpenVPNサーバ上にもClient側のサンプルファイルが存在しましたが、互換性などで上手く行かず、Tunnelblick側の設定ファイルを使うとうまくいったため、こちらを使います)

デスクトップにサンプルファイルが作成されるので、編集していきます。
自宅グローバルIP or DNS (username.com) の部分は適宜置き換えてください
$ vim ~/Desktop/Sample\ Tunnelblick\ VPN\ Configuration/config.ovpn
@@ -20,8 +20,8 @@
 # On most systems, the VPN will not function
 # unless you partially or fully disable
 # the firewall for the TUN/TAP interface.
-;dev tap
-dev tun
+dev tap0   # tap設定をサーバ側と合わせる
+;dev tun

 # Windows needs the TAP-Win32 adapter name
 # from the Network Connections panel
@@ -33,13 +33,13 @@
 # Are we connecting to a TCP or
 # UDP server?  Use the same setting as
 # on the server.
;proto tcp
proto udp   # 通信プロトコルをサーバ側と合わせる

 # The hostname/IP and port of the server.
 # You can have multiple remote entries
 # to load balance between the servers.
-remote my-server-1 1194
+remote username.com 1194   # NATのグローバル側IP(or レコード)を指定します、ポートがうまくNAT内のOpenVPNサーバにフォワードされている必要があります
 ;remote my-server-2 1194

 # Choose a random host from the remote
@@ -57,6 +57,12 @@
 # a specific local port number.
 nobind

+# OpenVPNサーバからパラメータを受け取る
+pull
+
+# OpenVPNサーバからIPアドレスを受け取る
+float
+
 # Downgrade privileges after initialization (non-Windows only)
 ;user nobody
 ;group nobody
@@ -86,8 +92,8 @@
 # for each client.  A single ca
 # file can be used for all clients.
 ca ca.crt
-cert client.crt
-key client.key
+cert client01.crt   # クライアント証明書名
+key client01.key   # クライアント鍵名

 # Verify server certificate by checking
 # that the certicate has the nsCertType
@@ -104,12 +110,12 @@

 # If a tls-auth key is used on the server
 # then every client must also have the key.
-;tls-auth ta.key 1
+tls-auth ta.key 1   # TLS通信のための鍵名

 # Select a cryptographic cipher.
 # If the cipher option is used on the server
 # then you must also specify it here.
-;cipher x
+cipher AES-256-CBC   # サーバ側と暗号化方式を合わせる

 # Enable compression on the VPN link.
 # Don't enable this unless it is also
@@ -121,3 +127,8 @@

 # Silence repeating messages
 ;mute 20
+
+mssfix 1300    # mssfix(セグメントサイズ?) サーバ側と合わせる
+link-mtu 1400  # MTU サーバ側と合わせる

### configファイルを改名
$ mv ~/Desktop/Sample\ Tunnelblick\ VPN\ Configuration/{config.ovpn,client01.ovpn}
OpenVPNサーバのkey path(/etc/openvpn/keys)から、 ca.crt, client01.crt, client01.key, ta.key を取得してきて、クライアント設定ファイルと同一ディレクトリに配置します。
先ほど設定した client01.ovpn をダブルクリックするとTunnelblickが起動してきて設定ファイルの取り込みが始まるので、よしなに設定していきます。


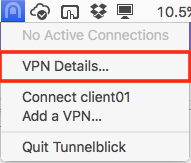
うまく設定が取り込まれた後、ステータスバーのTunnelblickアイコンを押すとclient01が追加されていることが確認できます。

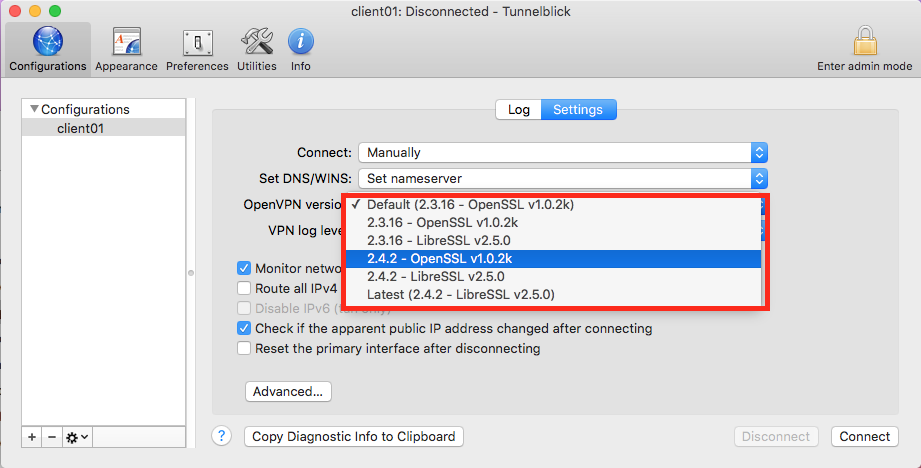
“VPN Details..” を押すとさらに設定画面が開くので、サーバのバージョン指定や、DNS関連の設定をしていきます。("Set DNS after routes are set"は設定しなくても 192.168.x.2 を見てくれるようになっていました)
“Route all IPv4 traffix through the VPN” をチェックすると、サーバ側の設定にかかわらず、すべてVPN経由でアクセスされるようなrouteが設定されるようです。


接続すると、ブリッジ接続にもかかわらず、IPアドレスが変更されていないので、すこし注意されます。(今回は192.168.xのみルーティングで経路変更している。 すべてVPN経由での接続にするのが基本なのかもしれません)

接続するとtap0に自宅LAN内のIPが紐付けられ、192.168.xのルーティングのみlink#xx経由でアクセスするように設定されているのが確認できます。
### VPN接続時のIPの確認
$ ifconfig
...
tap0: flags=8843<UP,BROADCAST,RUNNING,SIMPLEX,MULTICAST> mtu 1313
    ether -
    inet 192.168.x.64 netmask 0xffffff00 broadcast 192.168.x.255
    media: autoselect
    status: active
    open (pid 75040)

### ルーティングの確認
% netstat -rn | grep 192.168.x
192.168.x         link#11            UC              6        0    tap0
192.168.x.2      link#11            UHLWIi          1        0    tap0
192.168.x.255     link#11            UHLWbI          1      107    tap0

### 疎通確認
$ ping 192.168.x.3
$ ping 192.168.x.1
これで自宅NWに対してL2VPN経由でアクセスできるようになり、外で作業する際は非常に便利になりそうです。
補足
server.conf
 # TCP or UDP server?
- proto tcp
- ;proto udp
+ proto tcp
+ ;proto udp
...
 # Notify the client that when the server restarts so it
 # can automatically reconnect.
- ;explicit-exit-notify 1
explicit-exit-notify 1
config.ovpn (client)
 # Are we connecting to a TCP or
 # UDP server?  Use the same setting as
 # on the server.
- proto tcp
- ;proto udp
+ proto tcp
+ ;proto udp